CLI Intro

The Basics
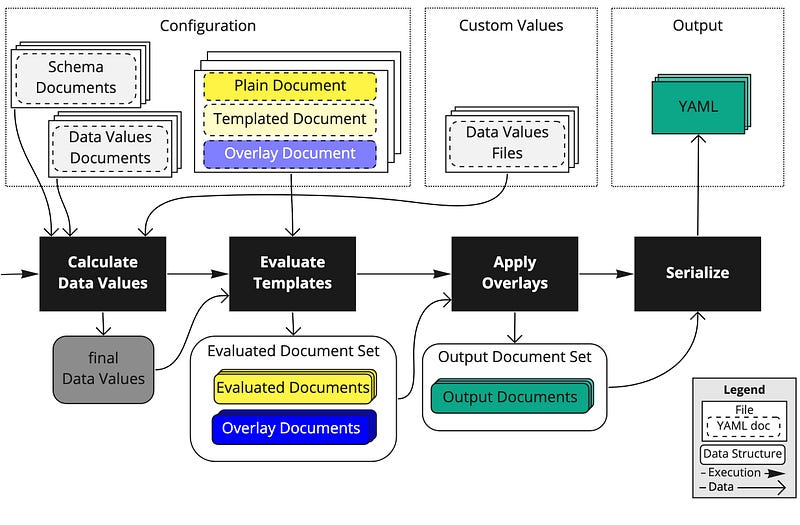
If you didn't spend anytime going over the diagram at the top, have a look now and store in your brain the terms templates, overlays, and data-values as new jargon you'll learn today. We're going to keep it simple. We're going to avoid the schemas and libraries (terms that ytt define and use, but are not necessary for the basic use cases we'll cover).
Also, I'm going to skip the installation instructions. Go read the instructions on the ytt website to install the software.
Since ytt is clearly a command-line tool, let's look at the command…
ytt -f config.yaml -f my-values.yaml
This command is the most basic form of using ytt. It takes our overlay file, config.yaml, and a source file, my-values.yaml, and outputs the templated configuration as a new yaml file.
Your Input File
Not to be confused with a "data-values" file? At it's most simplest, a yaml file can be used as a source file that's simply basic yaml. This is the data for the templating process.
Let's walk through an example using a pod spec, as it's a common Kubernetes resource that many users are familiar with.
Say we have the following my-values file:
---
apiVersion: apps/v1
kind: Deployment
metadata:
  name: myapp
spec:
  replicas: 3
  selector:
    matchLabels:
      app: myapp
  template:
    metadata:
      labels:
        app: myapp
    spec:
      containers:
        - name: myapp
          image: nginx:1.14.2
          ports:
            - containerPort: 80
          resources:
            limits:
              cpu: 500m
              memory: 512Mi
            requests:
              cpu: 250m
              memory: 256Mi
If we want to remove the resource limits, we can use ytt's overlay feature. Create the file called config.yaml
An Overlay File
#@ load("@ytt:overlay", "overlay")
#@overlay/match by=overlay.all
---
spec:
  template:
    spec:
      containers:
        #@overlay/match by=overlay.subset({"name": "myapp"})
        - resources:
            #@overlay/remove
            limits:
Putting it all together
Now run the command:
ytt -f config.yaml -f my-values.yaml > output.yaml
And you'll get the following output:
apiVersion: apps/v1
kind: Deployment
metadata:
  name: myapp
spec:
  replicas: 3
  selector:
    matchLabels:
      app: myapp
  template:
    metadata:
      labels:
        app: myapp
    spec:
      containers:
        - name: myapp
          image: nginx:1.14.2
          ports:
            - containerPort: 80
          resources:
            requests:
              cpu: 250m
              memory: 256Mi
What happened here? The overlay file removed the limits section from the resources section of the container.
Another Example
Now, say we want to change the name of the app from myapp to yourapp. We can use the overlay feature to change the name of the app.
Multiple Overlay Blocks
#@ load("@ytt:overlay", "overlay")

#@overlay/match by=overlay.all
---
metadata:
  #@overlay/match missing_ok=True
  labels:
    #@overlay/match missing_ok=True
    app: yourapp

#@overlay/match by=overlay.all
---
spec:
  #@overlay/match missing_ok=True
  selector:
    #@overlay/match missing_ok=True
    matchLabels:
      #@overlay/match missing_ok=True
      app: yourapp

#@overlay/match by=overlay.all
---
spec:
  template:
    #@overlay/match missing_ok=True
    metadata:
      #@overlay/match missing_ok=True
      labels:
        #@overlay/match missing_ok=True
        app: yourapp
Overlay Notes
Note the following:
- We've defined the
applabel asyourappin the overlay file. - We have to know the structure of the input file to create the overlay file.
- We have to know all the locations where the
applabel is used in the input file.
We'll go into more detail on the overlay file in the next section, but keep these points in mind as you work with ytt.
Now run the command:
ytt -f ya_config.yaml -f my-values.yaml > output_ya.yaml
apiVersion: apps/v1
kind: Deployment
metadata:
  name: myapp
  labels:
    app: yourapp
spec:
  replicas: 3
  selector:
    matchLabels:
      app: yourapp
  template:
    metadata:
      labels:
        app: yourapp
    spec:
      containers:
        - name: myapp
          image: nginx:1.14.2
          ports:
            - containerPort: 80
          resources:
            limits:
              cpu: 500m
              memory: 512Mi
            requests:
              cpu: 250m
              memory: 256Mi
Notice that the app label has been changed to yourapp in the output!
Next, we'll dive into more overlay features and how to use them to manipulate your yaml files.